You may have by now realized that you don’t regularly use the recycle bin on your desktop. Also, the recycle bin folder is only filling up your desktop space or you want a clean desktop therefore it would be nice to remove it. The other reason for intending to hide the icon is that you don’t like the icon. The problem is deleting it manually would not work and you may cause other problems. You may run the risk of emptying the recycle bin thus making the recovery of your important files difficult. Here are simple steps to guide on how to hide it from your desktop without any hassle.
Step 1
Go to your desktop screen and right click. Then click on the personalize option

Step 2
Still on the desktop right side, click on change icons

Step 3
You will see a settings window pop up like this.

Step 4
Click on OK option to hide you’re the recycle bin icon

You will see the recycle bin being removed from your desktop.
The bottom line is that removing the recycle bin from your desktop is a simple task once you follow the preceding procedures. The good thing is that you can restore it back again. If you do not like the icon you can also change it to your preferred choice
How to Show the Recycle Bin on Your Desktop
During cleaning of your desktop to create space, you may have accidentally removed your recycle bin. There is no need to panic; the icon can still be restored. It does not matter, what kind of computer you are using, there is a solution for that. Here are simple steps to recover the recycle bin back on your desktop
Step 1
Go to the start menu and click on the task bar

Step 2
A Control Panel appears on your right, click on it
Step 3
Then click on Appearance and Personalization option
Step 4
From there, click on Personalization

Step 5
Then go to the left side of the window, which is under the task category. Click on select the recycle bin of your choice. You can pick an empty one or a full one-the earlier deleted recycle bin. Here, you simply select your preferred recycle bin, then click on restore and finally OK.

You can also change the properties of the recycle bin including and not limited to its size to save you space.
How to Recover Lost Data from the Recycle Bin Using Wondershare Data Recovery
When you accidentally delete data from your computer, the recycle bin stores it temporary until you empty it. Hence, you get a chance to restore your files or data to their former location. If you are looking for effective Software with good recovery quality, look no more. Wondershare Data Recovery is the best data recovery software with fast scanning speed, supports various types of files with deep scanning. This software is a cross platform that is compatible with Mac and Windows operating system. You can either purchase or go for free trial version. Wondershare Data Recovery has incredible features, which beats the other data recovery software. It has three recovery methods that is raw recovery, lost file recovery and partition recovery. It also has various formats of data, which covers most of the file types like photos, documents, videos, emails and archives on your computer. This awesome software can also recover lost data from flash drives, hard drives, memory cards and other removable drives, digital camera and cell phones

- Recover lost or deleted files, photos, audio, music, emails from any storage device effectively, safely and completely.
- Supports data recovery from recycle bin, hard drive, memory card, flash drive, digital camera and camcorders.
- Supports to recover data for sudden deletion, formatting, hard drive corruption, virus attack, system crash under different situations.
- Preview before recovery allows you to make a selective recovery.
- Supported OS: Windows 10/8/7/XP/Vista, Mac OS X (Mac OS X 10.6, 10.7 and 10.8, 10.9, 10.10 Yosemite, 10.10, 10.11 El Capitan, 10.12 Sierra) on iMac, MacBook, Mac Pro etc.
How to recover lost/deleted files from an empty recycle bin
Below are important steps to help you recover your lost data using Wondershare Data Recovery software.
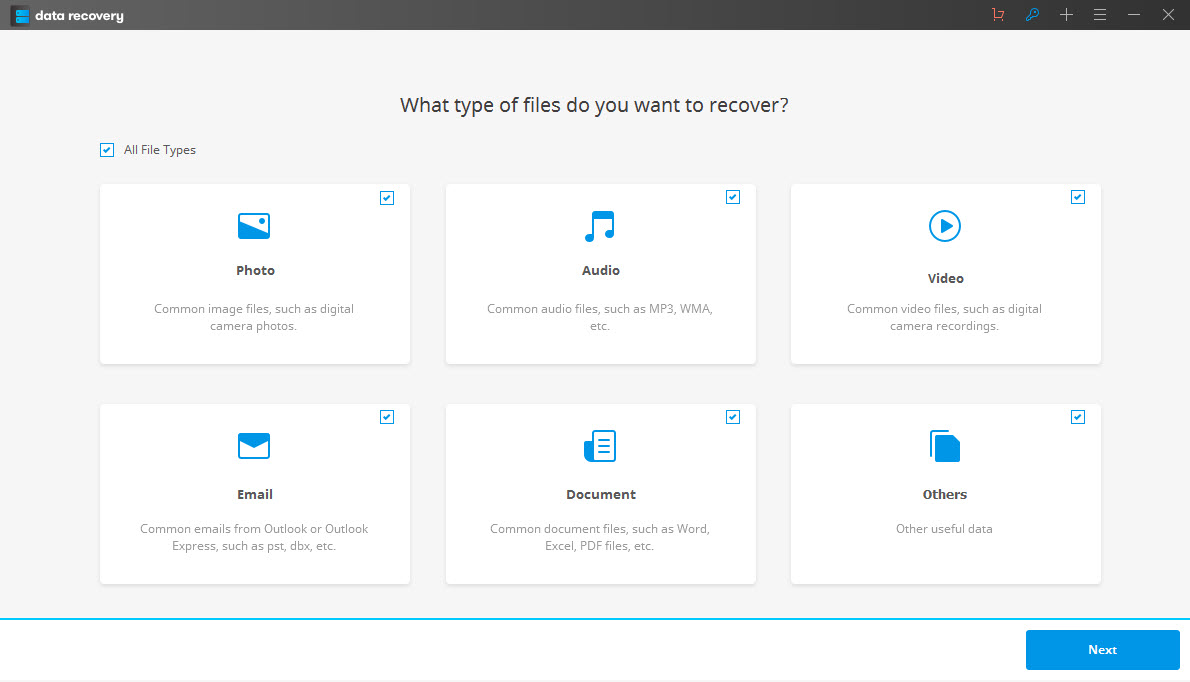
Step 1 Choose the recovery file type
First, you are required to choose a file type which you are going to receive back your videos,audios, photos and email. You may also consider recoving all lost files if they are important to you. Just make up your mind on what you want the software to recover before proceeding to the next step.

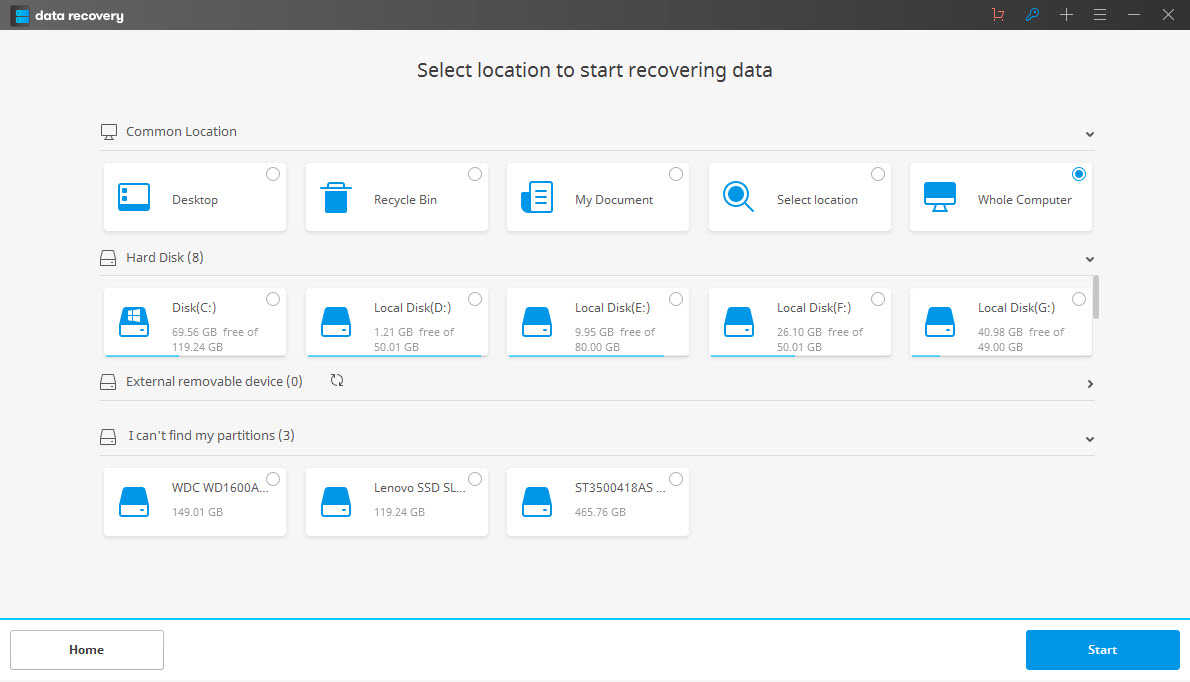
Step 2 Select the recover recycle bin
In order to recover your lost files from the recycle bin, choose the recycle bin to enable the recovery tool to scan through all the files in the recycle bin.

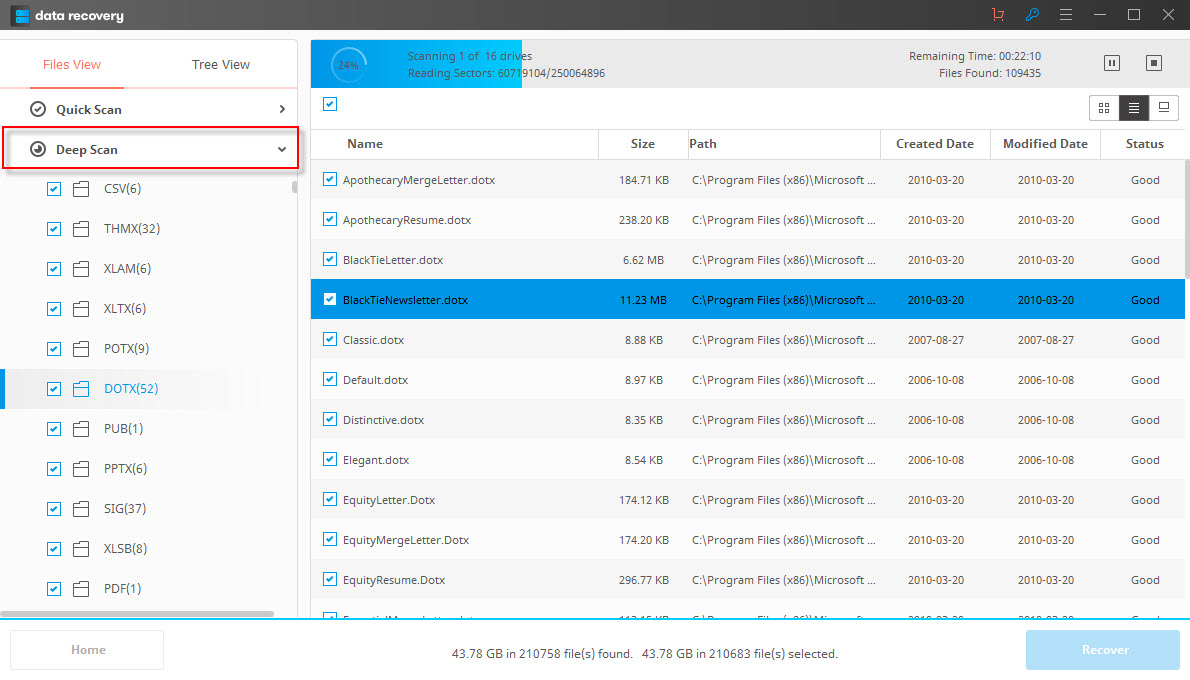
Step 3 Deep scan recycle bin
If quick scan can't find your lost files, you can go to deep scan recycle bin.

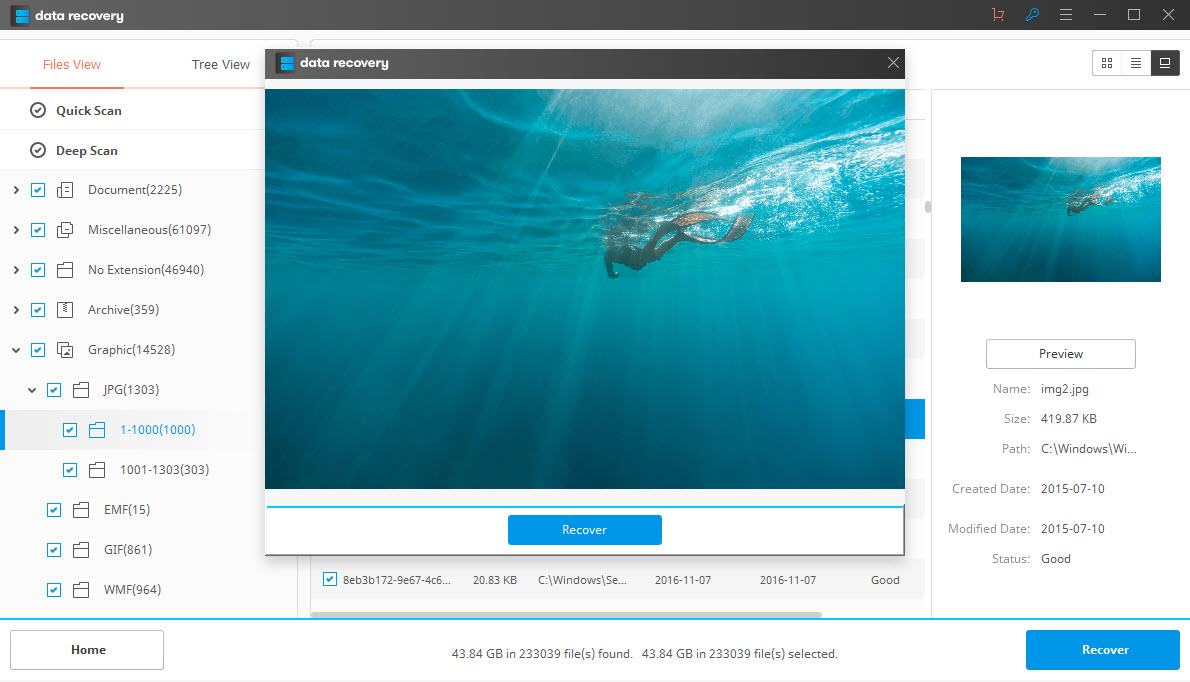
Step 4 Recovering deleted files from recycle bin
After the software completes scanning through the recycle bin, you can now preview the scan result. The recovered files are put in various categories to enable ease in indentification. Go through all the files you want them recovered, mark them then click recover. After a while you will receive all the lost files you wanted them to be retrieved.

If you don’t find your desired data, carry out a deep scan. Wondershare Data Recovery is the best data recovery I know. Give it a shot today if you need to retrieve important files. It is not worth it to keep agonizing over your lost files allow the software to be the solution.
Prügikast
- Taastuda prügikasti +


